Getting started
This section will walk you through a tutorial to get you up and running with Monster. By the end of this section you will have written, assembled, and debugged a complete program.
We will assume you are reasonably versed in 6502 assembly in this walkthrough. There are many great resources available to get you started if this is not the case, but this is not one of them. ;)
When you boot up Monster, you will be dropped into a full-screen editor. This is where programs are edited, saved, loaded, assembled, etc. It is also the launchpad for many other features, and the mode from which this is all done is aptly called command mode, which is the default mode that Monster enters on startup.
Advanced editor functionality is described later in this document, but to get started, press
 to enter insert mode. Insert mode behaves much like the stock KERNAL. That is,
letters are added to the source buffer upon entry.
to enter insert mode. Insert mode behaves much like the stock KERNAL. That is,
letters are added to the source buffer upon entry.
Type some characters and you will see them appear onscreen. Unlike the KERNAL, text cannot be arbitrarily entered anywhere on the screen. The screen displays a representation of the SOURCE BUFFER. If this buffer contains no further characters on the current line, you are unable to navigate to that position. If the buffer contains only 10 lines, you cannot navigate to line 11.
Press  and you will exit insert mode and return to command mode.
Now let’s return to insert mode and write a simple program. As with most assembly programs, our first order of business is to define where we are assembling.
On the first line, type:
.org $1000
Note that upon pressing  the line is automatically formatted. Labels are automatically left-aligned
by the autoformatter while everything else is indented by a tab character. Tabs can also be manually inserted by pressing
the line is automatically formatted. Labels are automatically left-aligned
by the autoformatter while everything else is indented by a tab character. Tabs can also be manually inserted by pressing
 + . However, practically speaking, you are unlikely to need to do this often (if ever) because of the formatter.
This tells the assembler to set the origin of what follows to address $1000. An origin is required before any instructions because, without it, the assembler doesn’t know where to assemble the instructions. With this taken care of, we can continue with the meat of our program. However, as we will later discuss, it isn’t necessarily an absolute address.
Next enter the following:
    ldx #0
loop
    lda msg,x
    beq done
    jsr $ffd2
    inx
    bne loop
Here we have defined a loop. Note that we have three instructions that reference labels. These are described in more detail later in this document, but as you can see in this example, they are left-aligned (begin at column 0) and are followed by whitespace. Although not shown above, they may, but are not required to, end with a ‘:’. If they do, the ‘:’ is not treated as part of the label name.
We’re almost done with the program. We referenced two labels in the above snippet that have not been defined. Now let’s finish the program making sure we do that:
done
    jmp *
msg .db "hello world!",0
Now we’ve defined a complete program. As is standard in 6502 assembly syntax the ‘*’ character represents the current assembly-time program counter for the line. Thus, “jmp *” means “jump to the address at the start of this line” or “jump to myself”. Also note how we declared the bytes for “msg” on the same line as the label definition. Labels are not required to be on their own line and may coexist with instructions, or other items we have yet to discuss (macros and directives to name a couple).
Now that our program is complete, it’s almost time for us to assemble it and run it. Before we can assemble the program, however, we must provide it a name.
To do this first press  from command mode. This puts the editor in EX mode.
In this mode, the editor accepts a string, interprets it, and executes it.
To name our source buffer, we will use the “r” (rename) command. Enter the following
at the prompt and press :
from command mode. This puts the editor in EX mode.
In this mode, the editor accepts a string, interprets it, and executes it.
To name our source buffer, we will use the “r” (rename) command. Enter the following
at the prompt and press :
:r HELLO.S
You should now see “HELLO.S” at the bottom of the screen (in the status bar). This means that our buffer has successfully accepted its new name.
You may be asking: why do we need to name our program before assembling? The answer is: debugging, which we will soon get to. Without a name, the debug information generated at assembly time doesn’t know which buffer our lines map to.
While a buffer can be assembled, the assembler cannot reference buffers. If you wish to assemble multiple buffers, they must be first saved to disk.
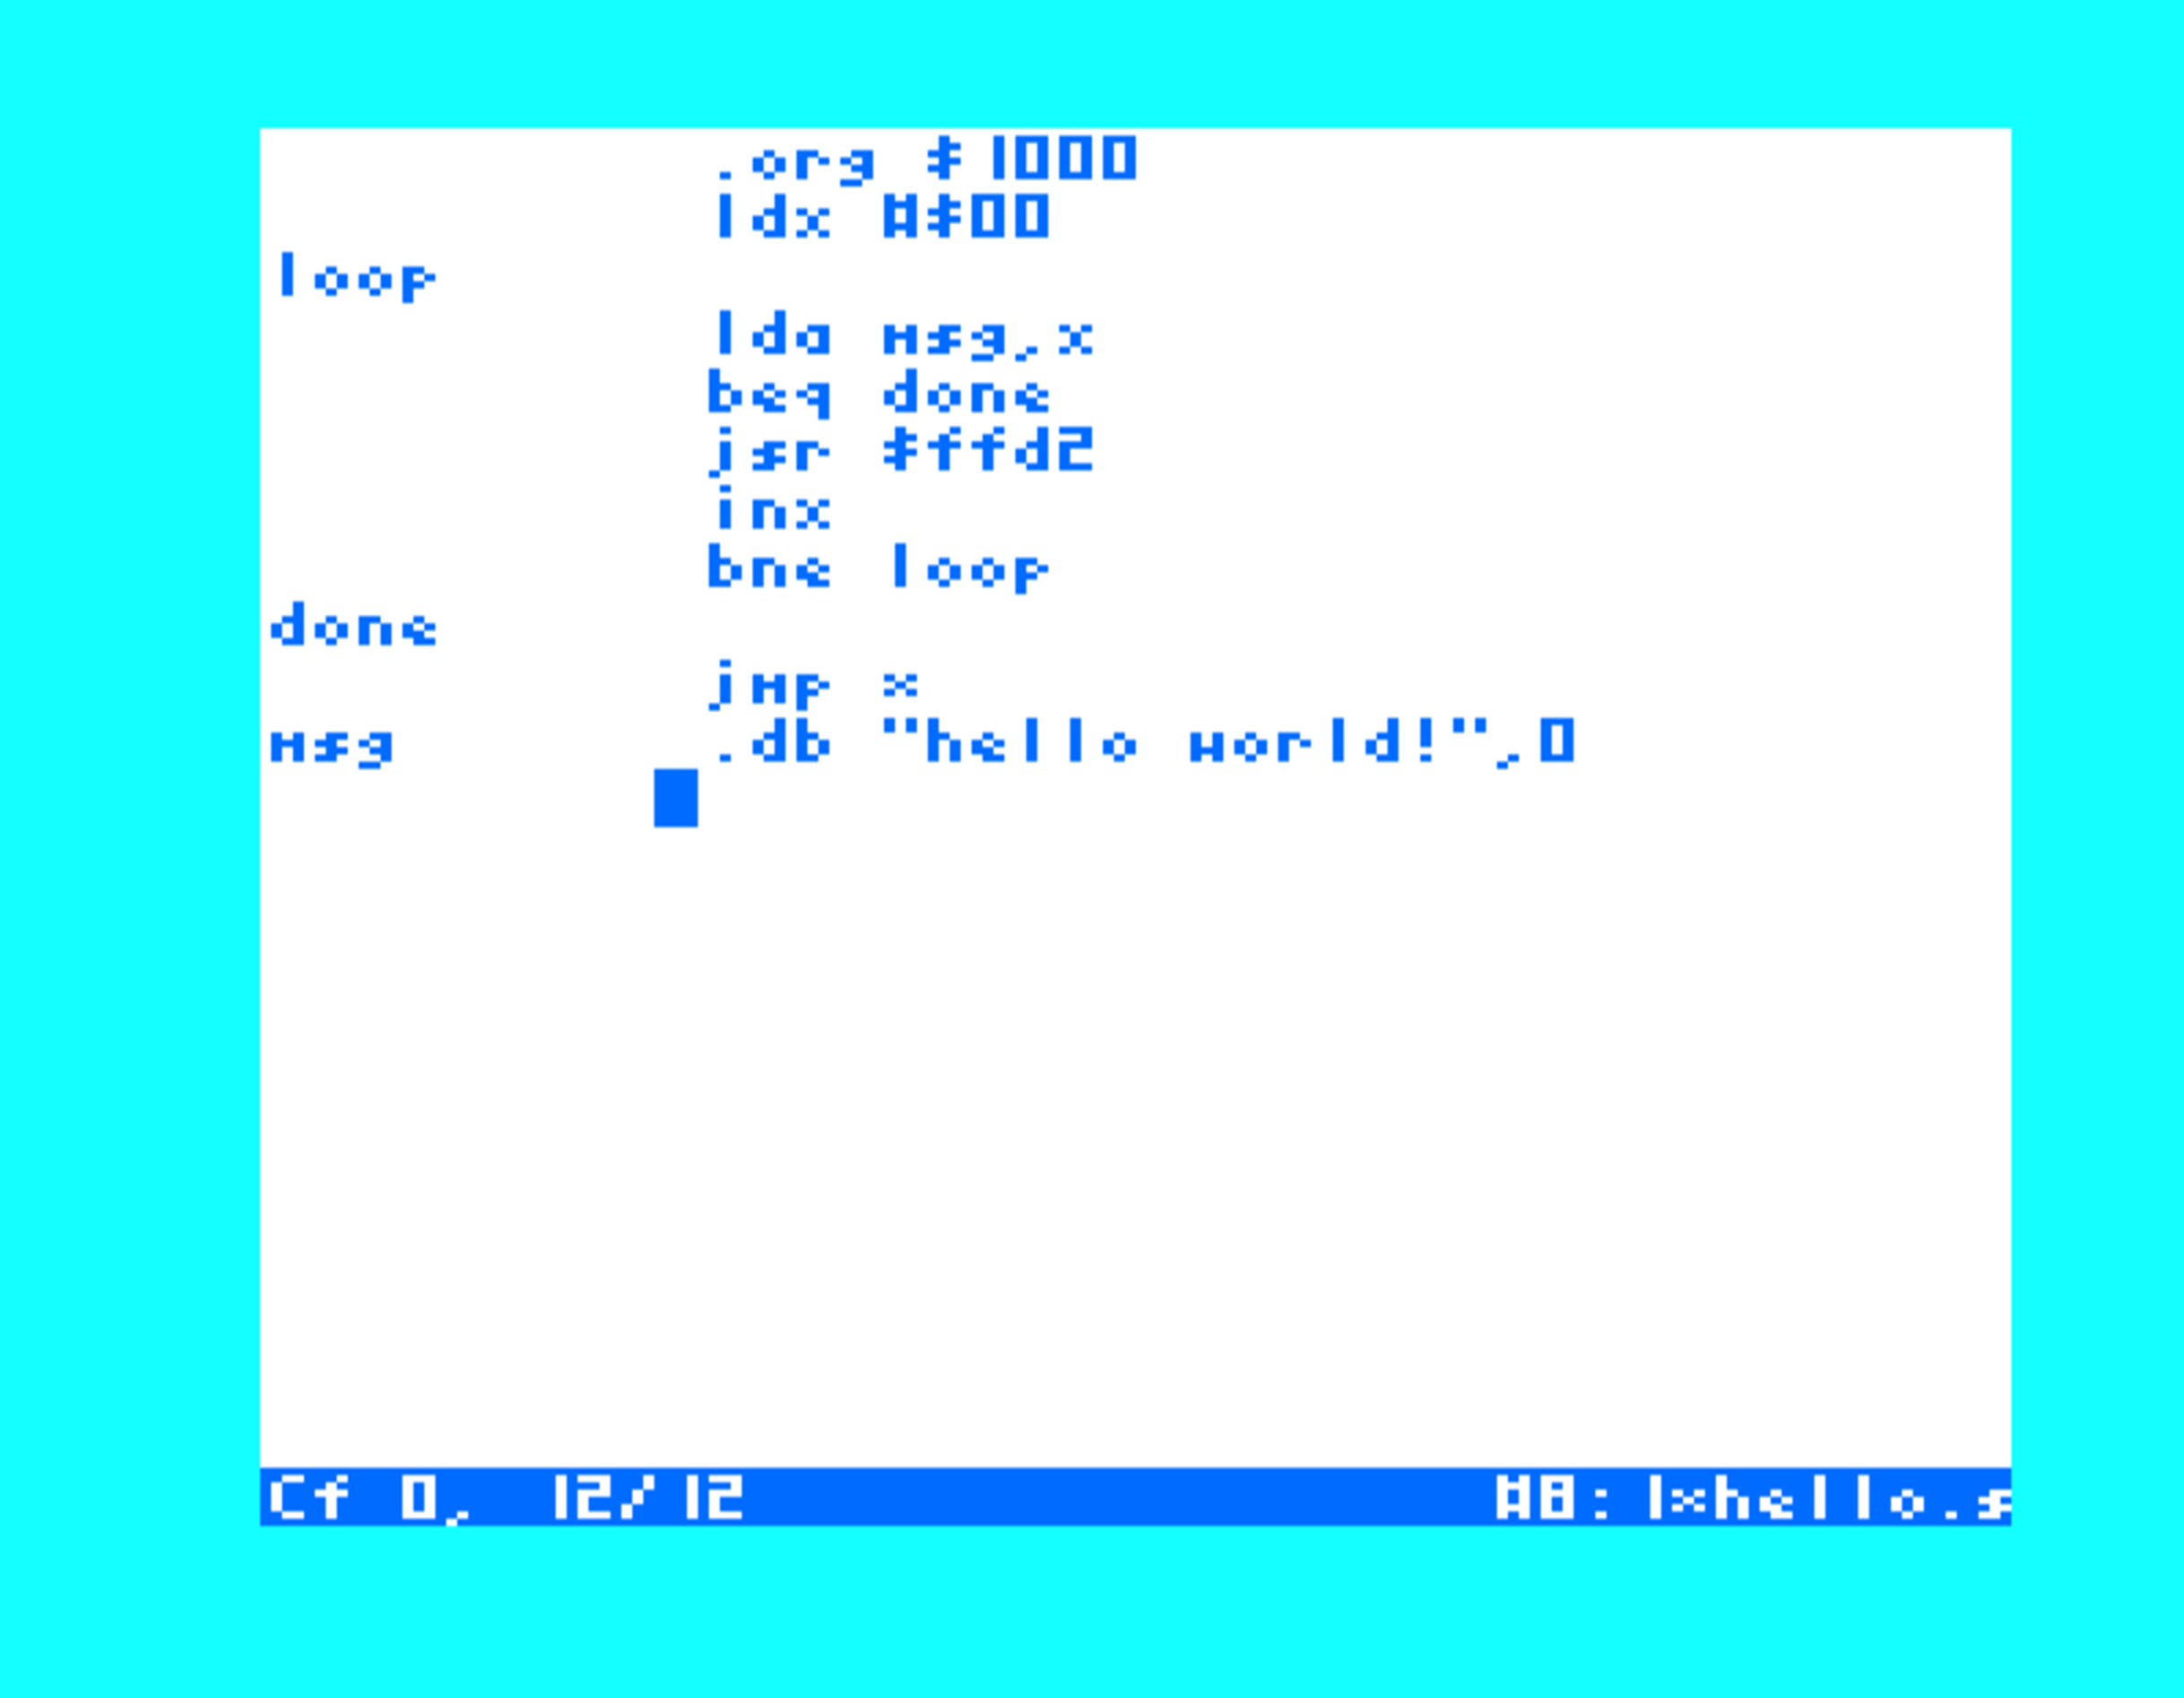
The finished program in the editor. The status bar shows the buffer’s new
name, HELLO.S, at the right.
With all the code written, and our buffer named, we’re finally ready to assemble the program.
Press  +
+  to do this. This can be done whether you are in insert mode or command mode.
The reason for this is because the +
to do this. This can be done whether you are in insert mode or command mode.
The reason for this is because the + <key> chords are considered universal keys, meaning they’re
handled the same way regardless of which mode you are in.
If you entered the program correctly, you should see a message like the one below telling you that the assembly was completed along with the address range it occupies.
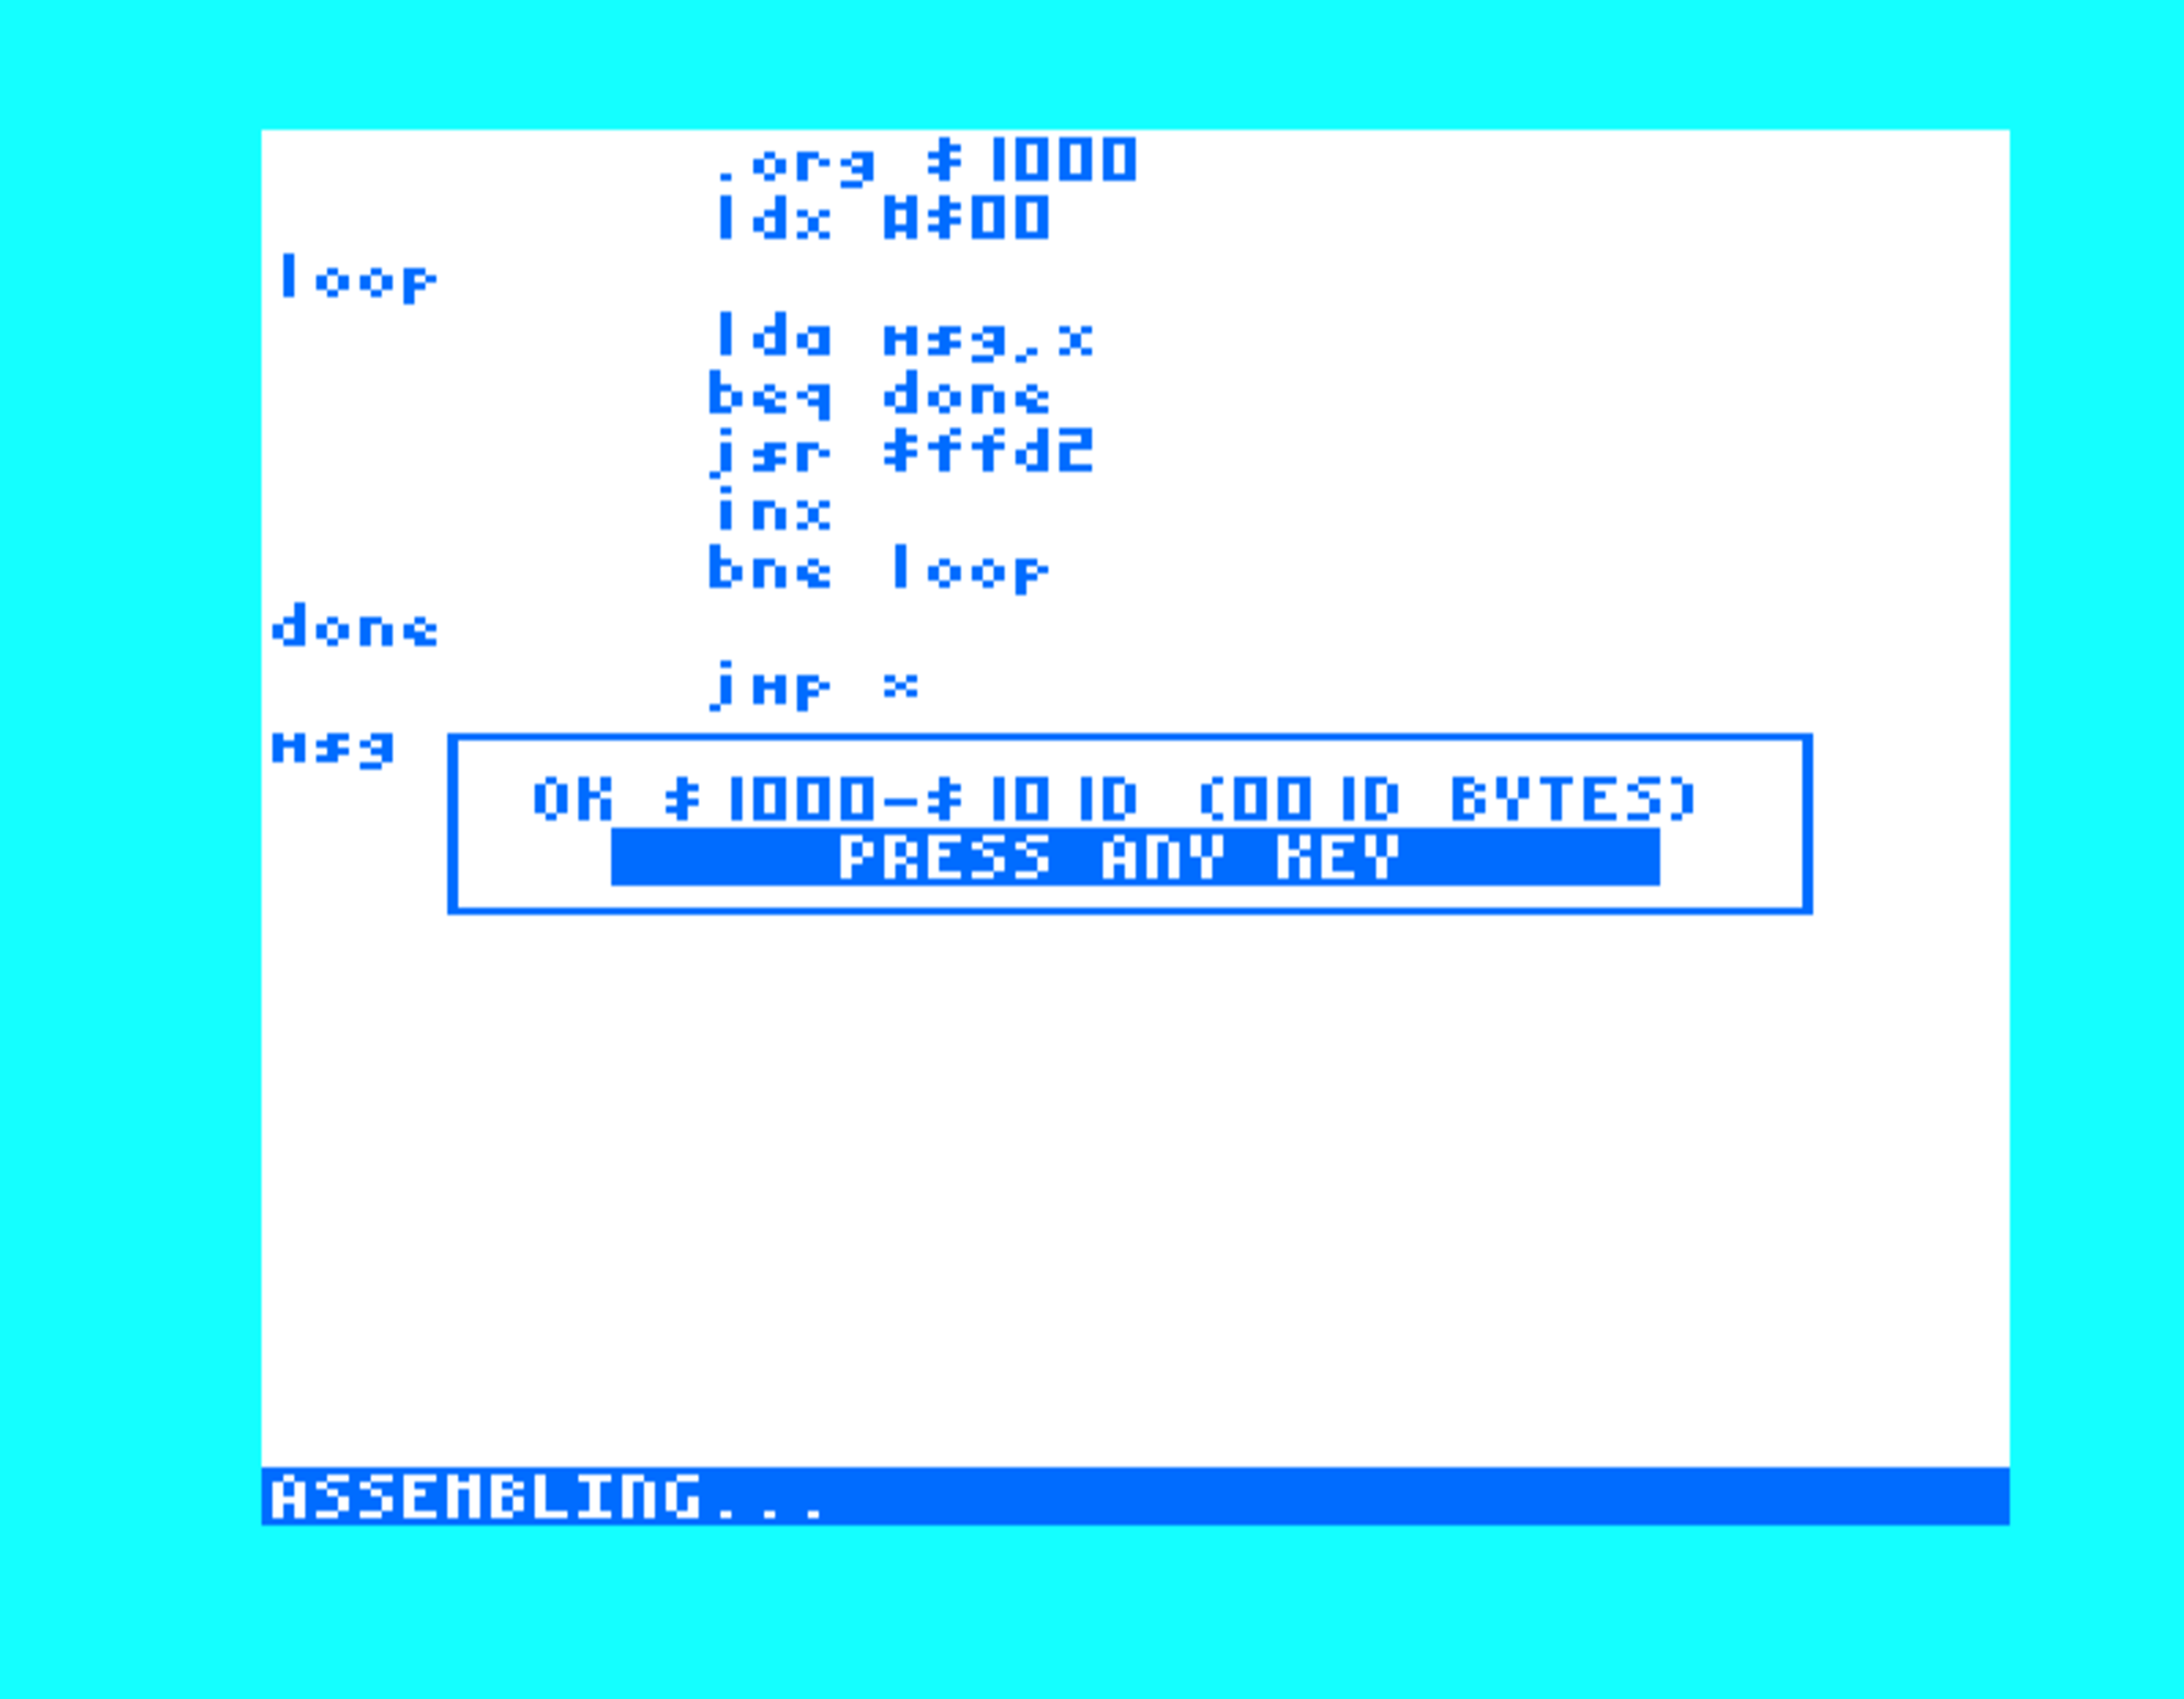
A successful assembly reports the address range that the program occupies.
With the program in memory, it’s time to debug it!
To enter the debugger, press +  . This will launch the debugger, a major component of Monster.
The debugger enables source-level debugging of an assembled program. At the bottom of the screen, the debugger displays information about the state of the machine at the current step of the program: the contents of the registers, the current line number, the number of cycles that have elapsed, and some other information.
Press  and the debugger will step into the program by one instruction.
You should now be at the next line of your program. Do this until you get to jsr $ffd2.
Step once more and you will notice that the debugger no longer shows you a line number.
That is because $ffd2 is not part of your program, so it has no line or even file to map to.
Because of that, the debugger will instead show you the address and instruction that it is executing.
and the debugger will step into the program by one instruction.
You should now be at the next line of your program. Do this until you get to jsr $ffd2.
Step once more and you will notice that the debugger no longer shows you a line number.
That is because $ffd2 is not part of your program, so it has no line or even file to map to.
Because of that, the debugger will instead show you the address and instruction that it is executing.
Since we trust that Commodore did a good job writing this KERNAL routine (no need to debug it),
we can simply press  to step out of this routine and back to our program.
If you stepped into several subroutines within $ffd2, you may need to repeat the command a couple times
to get back to your program.
Once the debugger has completed stepping out of the subroutine, it should place you at your
next line after the subroutine call:
to step out of this routine and back to our program.
If you stepped into several subroutines within $ffd2, you may need to repeat the command a couple times
to get back to your program.
Once the debugger has completed stepping out of the subroutine, it should place you at your
next line after the subroutine call: inx.
You can also execute a version of step that will step over subroutine calls.
Since, as we’ve established, we’re not too interested in debugging the Commodore KERNAL at the moment,
this command might be a better fit for us here. Press  (step over) a few times
and notice that when we reach the line
(step over) a few times
and notice that when we reach the line JSR $FFD2 the next iteration lands our cursor
on the INX after tracing all the KERNAL instructions in ROM.
Press  now and the screen will swap to a view that looks much like your VIC-20’s
BASIC startup screen. This is the current state of your program’s memory, also called virtual memory.
This is a common flow for debugging visual programs: step through your program until you’ve
reached a place you want to visibly observe, switch to the program screen to see if it matches your expectations,
and repeat.
now and the screen will swap to a view that looks much like your VIC-20’s
BASIC startup screen. This is the current state of your program’s memory, also called virtual memory.
This is a common flow for debugging visual programs: step through your program until you’ve
reached a place you want to visibly observe, switch to the program screen to see if it matches your expectations,
and repeat.
Press any key to return to the debugger.
Take a close look at the display and you should see that we have just printed a character to the screen by calling $FFD2.
Let’s run our program to finish displaying the message. To do this, press +  .
.
You should be back on the BASIC screen with your full message on display now.
Note that the GO command runs the program free of debugger intervention. Use it with caution as your program, likely in an unstable state, may leave the processor in an unrecoverable state and you will be forced to reset the machine if it does.
Congratulations on writing, assembling, and debugging your first program!
To return to the debugger, simply press  .
The debugger will catch you at the line that the CPU is currently running.
For us, this should be the endless loop we placed at the end of our program.
To exit the debugger, press +
.
The debugger will catch you at the line that the CPU is currently running.
For us, this should be the endless loop we placed at the end of our program.
To exit the debugger, press +  and confirm your intention to quit debugging at the prompt.
Assuming you have a disk drive attached, we may now wish to save our work that we have so proudly completed. You may have noticed a * indicator near your buffer name in the status bar. This
means you have edited the buffer since it was last written.
Enter EX mode once again and type:
:s HELLO.S
This will save your source code to a new file named, per our instruction, HELLO.S.
Note that the * indicator in the status bar has vanished.
If you’re still not convinced that your program is safe, you can confirm by pressing  while in command mode
to bring up a directory viewer. If all is well you should see your new program among
the other files on your disk.
while in command mode
to bring up a directory viewer. If all is well you should see your new program among
the other files on your disk.
Getting started with object code
Your first object file
The following instructions are overkill for any program you’re likely to write as you just get acquainted with the Monster environment, but sooner or later you may wish to work on projects that are thousands of lines long. These can take quite a while for the assembler to churn through.
More importantly, a large program can eat up many labels depending how liberally you use them. To break things up, it is often helpful to think of your program as individual “units” of assembly. This is the basis of the object code idea. You write your assembly files as self-contained parts, assemble these individually, and when you’re ready to produce your full binary, you link these object files together to produce the final program.
Assembling your program to object files with Monster is simple. Enter EX mode with ,
and then type o HELLO.O at the prompt. Note that this sends the active state of the
last assembly to the object file; it does not actually perform the assembly step.
The command assumes that you’ve done that yourself prior to running the command.
If all goes well, you will now have a new file on disk: HELLO.O. This is your object file.
By itself, this is insufficient to produce the linked binary.
The linker needs to know where to place the code inside this file. Enter the LINK file.
See the Linker chapter for the LINK file format and linking instructions.